How to Mass Delete Brushes from Procreate: A Simple Guide
Procreate is a fantastic digital art app that offers a wide variety of brushes to enhance your creative projects. However, over time, you might accumulate a vast number of brushes, making it hard to find the ones you use regularly. Mass-deleting brushes can help streamline your workflow and keep your brush library organized.
As an artist, keeping your tools organized is crucial. In Procreate, brushes are one of your primary tools, and having too many can slow you down. Whether you’ve downloaded numerous brush packs or created your own, managing them can become overwhelming. Mass-deleting brushes are an efficient way to declutter your collection and focus on what really matters.
In this guide, we’ll walk you through the process step-by-step and discuss the benefits of keeping your brush collection tidy.
Why You Might Want to Mass Delete Brushes
Streamlining Your Workflow
When your brush library is cluttered with brushes you don’t use, it can slow down your creative process. By mass-deleting unused brushes, you can streamline your workflow, making finding the tools you need easier and faster. This not only saves time but also helps you stay focused on your art without unnecessary distractions.
Reducing Clutter
A cluttered brush library can be overwhelming, especially when you have to scroll through hundreds of brushes to find the one you want. By getting rid of brushes you no longer use, you can reduce visual clutter and make your workspace more inviting and easier to navigate. This can lead to a more pleasant and less stressful drawing experience.
Improving Device Performance
Procreate, like any app, requires device resources to function smoothly. Having a large number of brushes can slow down the app’s performance, causing lag and potentially affecting your device’s overall speed. By deleting brushes you don’t need, you can free up resources and ensure that Procreate runs smoothly, allowing you to focus on your art without technical interruptions.
Preparing for Mass Deletion
Backing Up Essential Brushes
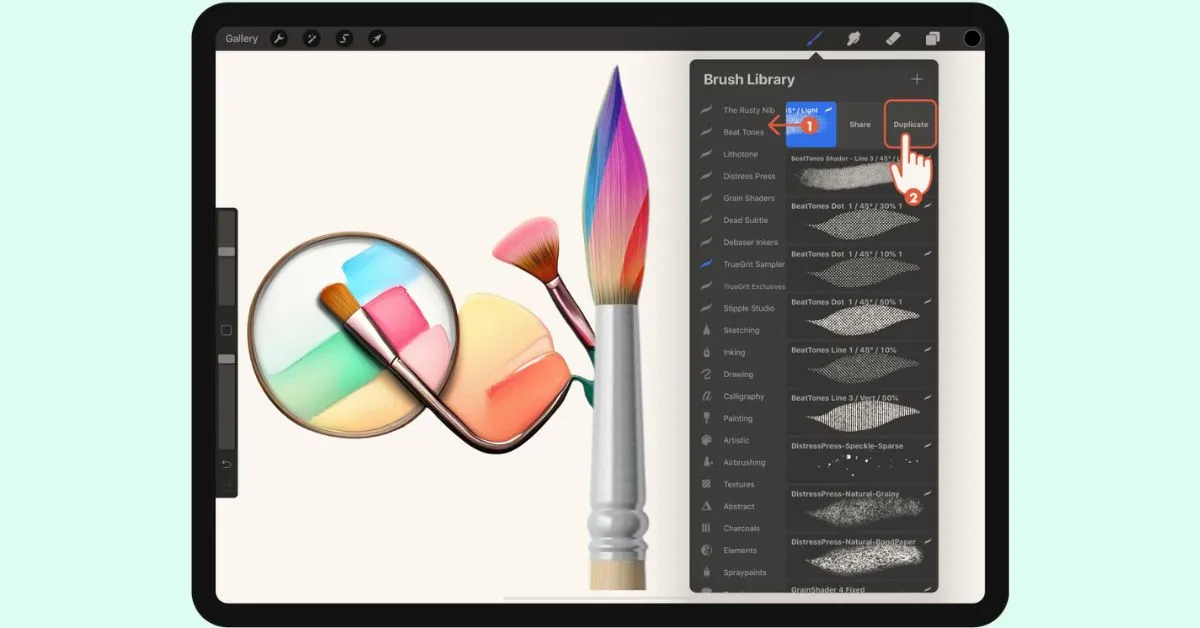
Before you start deleting brushes, it’s important to back up the ones you want to keep. This is especially crucial for brushes you’ve purchased or customized, as once they’re deleted, they’re gone for good. You can back up your brushes by exporting them. To do this, tap on a brush, then tap “Share” to save it to your desired location, such as a cloud storage service or your computer.
Identifying Brushes to Delete
Go through your brush library and identify which brushes you haven’t used in a while. It’s helpful to think about your current and future projects—if a brush doesn’t fit your style or you don’t see yourself using it, it’s a good candidate for deletion. Make a list or mental note of these brushes so you can delete them efficiently.
How to mass delete brushes from Procreate: Step-by-Step Guide
To access your brush library in Procreate:
- Open Procreate on your iPad.
- Create a new canvas or open an existing one.
- Tap on the brush icon located at the top right corner of the screen. This will open your brush library, displaying all your available brushes.
Procreate doesn’t currently support selecting multiple brushes for deletion in one action. However, you can streamline the process by using a few strategies:
- Creating a Temporary Brush Set: You can temporarily move brushes you want to delete into a new brush set. This won’t delete them, but it will make it easier to manage them in one place.
- Manual Selection: Unfortunately, you’ll have to manually delete each brush. Tap and hold a brush, then drag it to the set you want to move it or swipe left on the brush name to bring up the delete option.
Once you’ve grouped the brushes you want to delete or identified them, you can delete them as follows:
- Open the brush set containing the brushes you want to delete.
- Swipe left on the brush name.
- A red “Delete” button will appear. Tap on it to delete the brush.
- Confirm the deletion if prompted.
Repeat this process for each brush you want to remove. Although this process is manual, it helps ensure that you don’t accidentally delete brushes you want to keep.
Benefits of Deleting Unused Brushes
- Faster Navigation: Having a streamlined brush library makes it easier to navigate. With fewer brushes to sift through, you can quickly locate the brushes you use most often. This not only speeds up your workflow but also reduces the time spent searching for the right brush, allowing you to spend more time creating.
- Enhanced Creativity: A well-organized brush library can enhance your creativity by making it easier to experiment with different brushes. When you have a manageable number of brushes, you’re more likely to try new techniques and explore different styles. This can lead to creative breakthroughs and a more enjoyable drawing experience.
- Better Performance: Deleting unused brushes can improve Procreate’s performance. With fewer brushes, the app can load faster, and you may experience less lag when switching between brushes. This makes the drawing process smoother and more efficient, allowing you to focus on your artwork without any technical distractions.
Tips for Maintaining an Organized Brush Library
- Regular Clean-Up: To prevent your brush library from becoming cluttered again, it’s a good idea to regularly clean it up. Set a schedule—perhaps once every few months—to review your brushes and delete any that you no longer use. This habit can help you stay organized and keep your workflow efficient.
- Creating Custom Brush Sets: Organize your brushes into custom sets based on different categories, such as “Inking,” “Texturing,” or “Painting.” This makes it easier to find the right brush for a specific task and keeps your library organized. You can create a new set by tapping the “+” icon at the top of the brush library and naming the set.
- Naming and Categorizing Brushes: Give your brushes descriptive names and categorize them appropriately. For example, if you have a brush that’s great for clouds, you could name it “Cloud Brush.” This makes it easier to remember what each brush does and quickly find the one you need.
Conclusion
A tidy brush library in Procreate not only enhances your creative process but also improves the app’s performance and your device’s efficiency. By mass-deleting unused brushes, you can streamline your workflow, reduce clutter, and make your workspace more enjoyable. Remember to back up important brushes, regularly clean up your library, and organize your brushes into sets for easy access.
FAQs:
Can deleted brushes be recovered?
Once a brush is deleted from Procreate, it cannot be recovered unless you have backed it up beforehand. It’s always a good idea to export and save important brushes before deleting them.
Is there a limit to the number of brushes Procreate can handle?
Procreate doesn’t have a strict limit on the number of brushes you can have. However, having too many brushes can slow down the app and impact performance. It’s best to keep your library manageable for optimal performance.
What should I do if I accidentally delete a brush?
If you accidentally delete a brush, the only way to recover it is through a backup. If the brush was purchased, you might be able to re-download it from the source you purchased it from. Always back up your brushes to avoid accidental loss.
Can I delete default brushes in Procreate?
Yes, you can delete default brushes in Procreate if you don’t use them. However, it’s recommended to move them to a separate set instead of deleting them, in case you need them later.
How often should I organize my brush library?
It’s a good idea to review and organize your brush library every few months. This helps keep your collection fresh and relevant to your current projects and artistic style. Regular maintenance prevents clutter and ensures you always have easy access to the brushes you need.


